New Features in VEXcode EXP 4.0

VEXcode EXP 4.0 introduces a range of new features. This major update focuses on enhancing productivity and accessibility in robotics coding. Read below to learn what new features are available with VEXcode EXP 4.0!

Go here to download the new installer for VEXcode EXP 4.0!

CTE Workcell

VEXcode EXP now fully supports the CTE Workcell. The CTE Workcell introduces students to the world of industrial robotics and automation through hands-on activities.

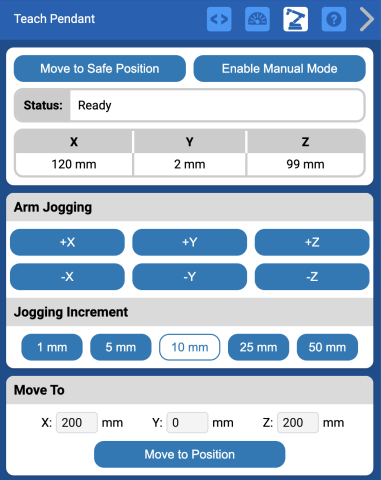
Image of the Teach Pendant in VEXcode EXP

In VEXcode EXP, the 6-Axis Robotic Arm can be directly connected to a computer without an EXP Brain to access the Teach Pendant.

Teach pendants are devices used to control and program robotic arms and other machinery for industrial automation and include buttons or a touch screen that allow operators to manually guide a robot's movements.

Connecting the 6-Axis Robotic Arm to an EXP Brain will also allow you to integrate new devices into your CTE project like the CTE Pneumatics system, Signal Tower, and Object Sensor.

Go here to learn more about the CTE Workcell and using it in classrooms.

Switch Blocks

New Switch Blocks are now available, making the transition from block-based coding to text-based programming seamless.

Animated GIF showing a user dragging a block labeled 'when started' from the coding palette into the workspace in the VEXcode interface, demonstrating the process of starting a new project.

Drag and Drop Switch Blocks: All Switch Blocks are available to be dragged from the toolbox and typed into directly.

Animated GIF showing a block-based program in VEXcode V5. The program starts with a yellow 'when started' block, followed by an orange 'repeat 4' block, and a blue 'drive forward for 200 mm' block. The GIF demonstrates a user dragging and connecting a green block below the existing blocks in the workspace.

Type Python Directly Into Blocks Projects: VEXcode allows you to incorporate Python commands directly into your projects, integrating them seamlessly with other Blocks. To assist you in writing correct code, VEXcode also provides an autocomplete feature for Python commands.

Animated GIF showing a simple VEXcode IQ Blocks program, where the sequence includes 'drive forward for 200 mm,' 'turn right for 90 degrees,' and another 'drive forward for 200 mm.' The blocks are assembled under the 'when started' block, demonstrating a basic robot movement sequence.

Code Conversion: Convert entire block stacks to Python with a single click.

This feature is perfect for learners looking to graduate from blocks to text. For more information about coding with Switch Blocks, go here.


Save and Load in Web-based VEXcode

Animated GIF of the VEXcode Project title bar changing from 'Not Saved' to 'Saved' after an action, indicating the project has been successfully saved.

Web-based VEXcode will now automatically save project changes once your project has been initially saved.

Other changes to the File Menu:

  • Load From Your Device has now been changed to Open.
  • Save to Your Device has now been changed to Save as.
  • You can also now manually save using the Save button.

For a step-by-step guide on how to load and save VEXcode EXP Project on a Chrome Browser, go here.


Updated AI Vision Sensor Detection

The AI Vision Sensor is now able detect AprilTags and AI Classifications.

A screenshot of the AI Vision Utility interface in VEXcode, displaying the camera's live feed capturing three AprilTags. The AprilTags feature is toggled on, while the AI Classification is turned off. The recognized tags are labeled with their respective IDs, coordinates, and dimensions. The 'Add Color' button is present, but the color settings are currently inactive. Firmware status is shown as up-to-date, with version 1.0.0.b16.

AprilTags are images that can be detected and have unique IDs. They can be printed out and used in fields for use with robots. Download a printable AprilTag PDF here.

Screenshot of an 'AI Vision Utility' interface. The interface is connected, indicated by a green 'Connected' status. The main section shows a live camera feed with four objects detected: a red ball, a blue ball, a green ring, and a red ring, each with bounding boxes displaying their positions (X, Y), dimensions (W, H), and confidence scores (99%). The right panel has options for enabling AprilTags and AI Classification, with the AI Classification set to 'Classroom Elements.' There's an option to name and set a color, with buttons for 'Add Color' and a 'Freeze Video' button below the live feed. Firmware status is indicated as 'Up to Date' with version '1.0.0.b16.'

The AI Vision Sensor can also identify different colored buckyballs and rings from the VEX EXP Classroom Bundles.

Go here to learn about how to use the AI Vision Sensor in Blocks, Python, and C++.


Read Blocks Aloud

All Blocks inside VEXcode EXP 4.0 can now be read aloud with a simple right-click.

This feature is available on all devices but Android.

  • Customizable Voices: Choose from various voices and adjust speed and pitch in the new Tools Menu.
  • Context Menu Integration: Right-click any block to hear it read aloud.

Go here for step-by-step instructions on how to use the Read Feature in VEXcode.


Tools Menu

VEXcode EXP 4.0's new Tools Menu is packed with features for productivity and accessibility.

A cropped screenshot showing the 'Tools' dropdown menu in VEXcode V5. The menu includes options for 'Theme,' 'Keyboard Shortcuts,' 'Speech Settings,' and 'API Documentation.' The 'TUTORIALS' section is highlighted at the top of the dropdown.

Keyboard Shortcuts

There are new Keyboard shortcuts available for starting, stopping, and opening help documentation.

Mac Windows
VEXcode Project window showing the 'Tools' dropdown menu with 'Keyboard Shortcuts' highlighted. The submenu displays keyboard shortcuts for Start, Stop, and Open Help actions, including ⌘ + return for Start, ⌘ + e for Stop, and ⌘ + h for Open Help. Tools menu in VEXcode with the Keyboard Shortcuts submenu highlighted. The submenu displays keyboard shortcuts, including 'Start' (Ctrl + Enter), 'Stop' (Ctrl + e), and 'Open Help' (Ctrl + h).

High Contrast Theme

High contrast themes increase the distinction between text and background, making content easier to read for users with low vision, color blindness, or other visual impairments.

Default High Contrast
A screenshot of a VEXcode V5 block-based program shows a sequence of blocks designed to control robot movement and display messages. The program starts with a 'when started' block, followed by a loop that repeats four times. Inside the loop, the robot drives forward for 200 mm, turns right for 90 degrees, and prints the current heading in degrees on the Brain. After the loop, the program prints 'Movement is complete' on the Brain. A screenshot of a VEXcode V5 block-based program shows a sequence of blocks designed to control robot movement and display messages. The program starts with a 'when started' block, followed by a loop that repeats four times. Inside the loop, the robot drives forward for 200 mm, turns right for 90 degrees, and prints the current heading in degrees on the Brain. After the loop, the program prints 'Movement is complete' on the Brain.

Speech Settings

Working with the new Read Blocks feature, you can change the voice used, the speed of speech, and the pitch from this menu.

A screenshot of the Speech Settings window in VEXcode IQ. The window allows users to select a voice from a dropdown menu labeled 'Voices,' with 'Microsoft D' currently selected. There are two sliders below, one for 'Pitch' and one for 'Speed,' both set at 100%. A green button labeled 'Test Voice' is below the sliders. At the bottom right corner, there is a blue 'Done' button.

API Documentation

Access comprehensive API documentation, making it easier than ever to explore and utilize the full potential of your VEX EXP robot.

A screenshot from the VEX EXP API Reference website, showing the documentation for the turn_for() method in the DriveTrain class. The turn_for() method is used to turn the Drivetrain for a specific angle in either direction. The parameters listed include direction (a valid TurnType), angle (the angle for the Drivetrain to turn), units (optional, with a default of DEGREES), velocity (optional), units_v (optional, with a default of RPM), and wait (optional). The method can be either blocking or non-blocking, depending on the wait parameter.

Click here to access the official VEX API Reference site.


Web-based Wireless Project Downloads

Web-based VEXcode EXP is now able to wirelessly connect to an EXP Brain through an EXP Controller.

A screenshot showing the VEXcode V5 toolbar. The toolbar has the 'CONTROLLER' and 'BRAIN' icons highlighted in red, indicating that these are the selected devices for the project. Next to them are the 'DOWNLOAD,' 'RUN,' 'STOP,' 'SHARE,' and 'FEEDBACK' buttons.

To learn how to wirelessly download a project to your EXP Brain, go here.

For more information, help, and tips, check out the many resources at VEX Professional Development Plus

Last Updated: